Bring Your Own Cloud (BYOC)
Deploy Pinecone BYOC in your own AWS, GCP, or Azure account for data sovereignty, network isolation, and regional data residency requirements.
Pinecone BYOC (Bring Your Own Cloud) is designed for organizations with strict requirements around data sovereignty, network isolation, and data residency.
With BYOC, you deploy the Pinecone data plane in your own cloud account (AWS, GCP, or Azure), and you get the benefits of a managed service — upgrades, scaling, and maintenance — without giving up control of your data or infrastructure.
Pinecone never has direct access to your cloud account. Your vectors, metadata, and queries never leave your environment, and no inbound network access is required. An agent in your cluster pulls operations from Pinecone and executes them locally.
Architecture
Section titled “Architecture”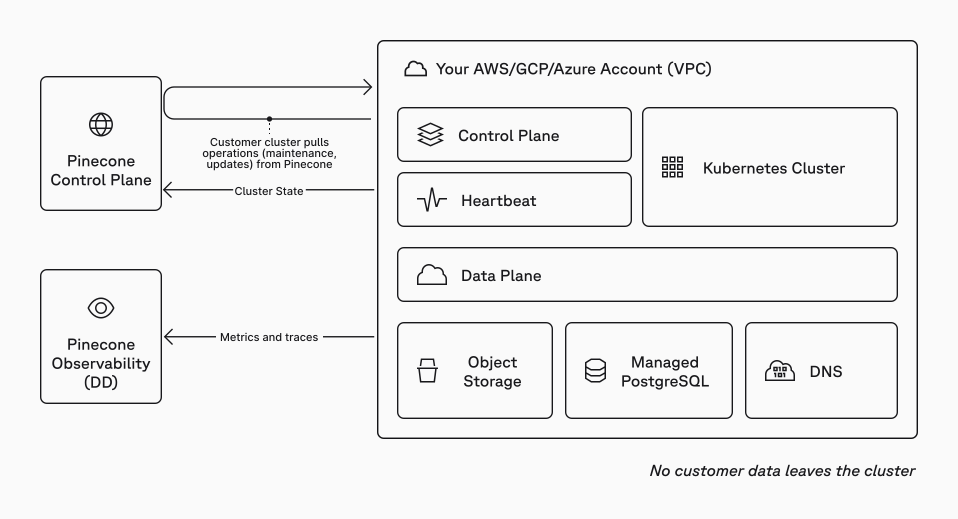
BYOC uses a split architecture:
- The data plane runs entirely in your cloud account within a dedicated VPC, storing and processing your vectors, executing queries, and managing index data in object storage (S3 on AWS, GCS on GCP, or Azure Blob Storage on Azure). Cluster metadata lives in FoundationDB, which runs inside your Kubernetes cluster, so there's no managed database to operate.
- The control plane is managed by Pinecone globally and handles index lifecycle management, authentication, billing, and user management, but never stores or processes your vectors.
For maintenance, the agent authenticates with Pinecone's control plane, pulls pending operations (upgrades, scaling, etc.), and executes them locally. All operations are stored as Kubernetes CRDs, providing a complete audit trail.
Only operational metrics (CPU, memory, latency) and traces are transmitted to Pinecone for monitoring; customer data is filtered out before transmission.
Encryption and customer-managed keys
Section titled “Encryption and customer-managed keys”In the standard Pinecone service, customer-managed encryption keys (CMEK) are how you connect Pinecone-managed storage to your AWS KMS keys through the Pinecone console.
In BYOC, that console CMEK flow doesn't apply. Your vectors and index data are stored in your cloud account (for example, object storage and block storage), so you apply your cloud provider’s KMS to those resources using the same native controls you use for other workloads (key policies, rotation, and compliance programs such as PCI or ISO 27001). When you deploy with pulumi-pinecone-byoc, you can supply your KMS key where the template supports it. For the current options, see the pulumi-pinecone-byoc README.
Prerequisites
Section titled “Prerequisites”Before deploying BYOC, ensure you have the following tools installed on your local machine:
| Tool | Purpose | Install |
|---|---|---|
| Python 3.12+ | Runtime | python.org |
| uv | Package manager | docs.astral.sh/uv |
| Pulumi | Infrastructure-as-code | pulumi.com/docs/install |
| kubectl | Cluster access | kubernetes.io |
You also need:
- The CLI for your cloud provider:
- AWS: AWS CLI v2
- GCP: gcloud CLI
- Azure: Azure CLI
- A cloud account with admin-level permissions:
- AWS:
AdministratorAccess.PowerUserAccessisn't sufficient because BYOC creates IAM roles and policies. - GCP:
roles/owner.roles/editorisn't sufficient because BYOC creates IAM service accounts and bindings. - Azure:
Owneron the subscription.Contributorisn't sufficient because BYOC creates managed identities and role assignments.
- AWS:
- Sufficient cloud quota for the resources (the setup wizard validates this)
- A Pinecone API key from the Pinecone console.
- A Pinecone Enterprise plan (required for BYOC access)
Deploy BYOC
Section titled “Deploy BYOC”To deploy BYOC, follow these steps:
Run the setup wizard
Run the bootstrap script from the BYOC deployment repository (github.com/pinecone-io/pulumi-pinecone-byoc) to start the interactive setup wizard:
Bash curl -fsSL https://raw.githubusercontent.com/pinecone-io/pulumi-pinecone-byoc/main/bootstrap.sh | bashYou can also pre-select your cloud provider:
Bash # AWS curl -fsSL https://raw.githubusercontent.com/pinecone-io/pulumi-pinecone-byoc/main/bootstrap.sh | bash -s -- --cloud aws # GCP curl -fsSL https://raw.githubusercontent.com/pinecone-io/pulumi-pinecone-byoc/main/bootstrap.sh | bash -s -- --cloud gcp # Azure curl -fsSL https://raw.githubusercontent.com/pinecone-io/pulumi-pinecone-byoc/main/bootstrap.sh | bash -s -- --cloud azureThe script selects your cloud provider, checks that required tools are installed, verifies your cloud credentials, then launches an interactive wizard that collects your configuration choices, validates your quotas, and generates a Pulumi project. No cloud resources are created during this step.
Setup wizard prompts
The wizard prompts you for the following:
Prompt Description Default Cloud provider Select AWS, GCP, or Azure (skipped if pre-selected via --cloud).- Pinecone API key Your API key from the Pinecone console (or uses PINECONE_API_KEYenv var).- Cloud credentials Validates credentials and displays your account/project/subscription ID. - GCP project ID (GCP only) Your GCP project ID. Detected from gcloudAzure subscription ID (Azure only) Your Azure subscription ID. Detected from az account showRegion Region for deployment. us-east-1(AWS) /us-central1(GCP) /eastus(Azure)Availability zones Zones for high availability. Wizard fetches available options. First two zones Custom AMI (AWS only) Custom AMI ID for EKS nodes. Leave blank for the default AWS AMI. None VPC CIDR block IP range for your VPC/VNet. Choose a range that doesn't conflict with existing networks. 10.0.0.0/16(AWS/Azure) /10.112.0.0/12(GCP)Deletion protection Protect object storage from accidental deletion. Enabled Network access Public access (connect from anywhere) or private only (requires PrivateLink on AWS, Private Service Connect on GCP, or Private Link on Azure). Public enabled Resource tags/labels Custom tags (AWS/Azure) or labels (GCP) for cost tracking (e.g., team=platform,env=prod).None Preflight checks Validates cloud quotas. If checks fail, request quota increases before proceeding. - Project name Name for your deployment. pinecone-byocPulumi backend Where to store state: local ( ~/.pulumiwith passphrase) or Pulumi Cloud.Local After completing the wizard, a Pulumi project is generated in your project directory.
Generated configuration file
The wizard creates a
Pulumi.<stack>.yamlfile with configurable options. The options vary by cloud provider:Option Description Default pinecone-versionPinecone release version - regionAWS region us-east-1availability-zonesAvailability zones for high availability ["us-east-1a", "us-east-1b"]vpc-cidrVPC IP range 10.0.0.0/16deletion-protectionProtect S3 buckets from accidental deletion truepublic-access-enabledEnable public endpoint ( false= PrivateLink only)truecustom-ami-idCustom AMI ID for EKS nodes Default AWS AMI tagsCustom tags for all AWS resources {}Option Description Default gcp:projectGCP project ID - pinecone-versionPinecone release version - regionGCP region us-central1availability-zonesZones for high availability ["us-central1-a", "us-central1-b"]vpc-cidrVPC IP range 10.112.0.0/12deletion-protectionProtect GCS buckets from accidental deletion truepublic-access-enabledEnable public endpoint ( false= Private Service Connect only)truelabelsCustom labels for all GCP resources {}Option Description Default subscription-idAzure subscription ID - pinecone-versionPinecone release version - regionAzure region eastusavailability-zonesZones for high availability ["1", "2"]vpc-cidrVNet IP range 10.0.0.0/16deletion-protectionProtect storage accounts from accidental deletion truepublic-access-enabledEnable public endpoint ( false= Private Link only)truetagsCustom tags for all Azure resources {}To change configuration after initial setup, edit
Pulumi.<stack>.yamland runpulumi up.Programmatic usage
For advanced users who want to integrate BYOC into existing Pulumi infrastructure, the
pulumi-pinecone-byocpackage is available on PyPI. Install with cloud-specific dependencies:Bash # For AWS uv add 'pulumi-pinecone-byoc[aws]' # For GCP uv add 'pulumi-pinecone-byoc[gcp]' # For Azure uv add 'pulumi-pinecone-byoc[azure]'Import the cluster class for your cloud provider:
Python # AWS from pulumi_pinecone_byoc.aws import PineconeAWSCluster, PineconeAWSClusterArgs # GCP from pulumi_pinecone_byoc.gcp import PineconeGCPCluster, PineconeGCPClusterArgs # Azure from pulumi_pinecone_byoc.azure import PineconeAzureCluster, PineconeAzureClusterArgsSee the repository README for full usage examples.
Deploy the infrastructure
Deploy the generated Pulumi project to create your cloud resources:
Bash cd pinecone-byoc pulumi upPulumi shows a preview of all resources to be created. Confirm to proceed. Provisioning takes approximately 25-30 minutes.
When complete, the output displays:
- Your BYOC environment name (used when creating indexes).
- The kubectl command to configure cluster access.
Infrastructure provisioned
The deployment creates the following resources in your cloud account:
Component AWS GCP Azure VPC / Networking VPC, public and private subnets, NAT gateways, internet gateway VPC network, subnets, Cloud NAT, Cloud Router VNet, subnets, NAT gateway Kubernetes EKS cluster with managed node groups GKE cluster with node pools AKS cluster with agent pools Object storage S3 buckets (data, WAL, backups) GCS buckets (data, WAL, backups) Blob Storage containers (data, WAL, backups) Block storage EBS volumes Persistent Disk Managed Disks Metadata store FoundationDB (in-cluster) FoundationDB (in-cluster) FoundationDB (in-cluster) Load balancing Network Load Balancer Internal load balancer with Private Service Connect Internal load balancer with Private Link Service DNS Route 53 hosted zone Cloud DNS managed zone Azure DNS zone TLS certificates AWS Certificate Manager cert-manager cert-manager IAM IAM roles and policies Service accounts and Workload Identity Managed identities and Workload Identity The initial deployment provisions 3 Kubernetes nodes. After setup, the cluster autoscales based on the services Pinecone deploys and your workload.
Verify the deployment
Configure
kubectlto connect to your cluster using the command from the deployment output:Bash aws eks update-kubeconfig --region <region> --name <cluster-name>Bash gcloud container clusters get-credentials <cluster-name> --region <region> --project <project-id>Bash az aks get-credentials --resource-group <resource-group> --name <cluster-name>The above command configures your local
kubectltool to communicate with your Kubernetes cluster. You'll use cluster access for administrative tasks like viewing operations and troubleshooting. Creating indexes and reading/writing vectors still use the standard Pinecone API.Verify all components are running:
Bash # Check that all pods are running kubectl get pods -A | grep -E "(pinecone|pc-)"All pods should show
Runningstatus. If any pods are inPendingorCrashLoopBackOff, check the Troubleshooting section.You can also verify the cluster operations CRD is installed:
Bash kubectl get cluster-operationsIt's normal to see "No resources found" on a fresh deployment. Operations appear here as Pinecone performs upgrades and other management tasks.
Use BYOC
Section titled “Use BYOC”Once your BYOC environment is deployed, you can create indexes and read/write data using the standard Pinecone API.
Control plane operations
Section titled “Control plane operations”Control plane operations like creating, listing, and deleting indexes work via the standard Pinecone API regardless of your network access mode.
Create an index
Use the environment name from the deployment output to create indexes in your BYOC environment. BYOC supports dedicated read nodes indexes only.
PINECONE_API_KEY="YOUR_API_KEY"

curl -X POST "https://api.pinecone.io/indexes" \
     -H "Accept: application/json" \
     -H "Content-Type: application/json" \
     -H "Api-Key: $PINECONE_API_KEY" \
     -H "X-Pinecone-Api-Version: 2025-10" \
     -d '{
           "name": "example-byoc-index",
           "dimension": 1536,
           "metric": "cosine",
           "vector_type": "dense",
           "spec": {
             "byoc": {
               "environment": "aws-us-east-1-26bf.byoc",
               "read_capacity": {
                 "mode": "Dedicated",
                 "dedicated": {
                   "node_type": "b1",
                   "scaling": "Manual",
                   "manual": {
                     "shards": 1,
                     "replicas": 1
                   }
                 }
               }
             }
           },
           "deletion_protection": "disabled"
}'from pinecone import Pinecone
from pinecone.db_control.models import ByocSpec
pc = Pinecone(api_key="YOUR_API_KEY")
pc.db.index.create(
name="example-byoc-index",
dimension=1536,
metric="cosine",
vector_type="dense",
spec=ByocSpec(
environment="aws-us-east-1-26bf.byoc",
read_capacity={
"mode": "Dedicated",
"dedicated": {
"node_type": "b1",
"scaling": "Manual",
"manual": {
"shards": 1,
"replicas": 1,
},
},
},
),
deletion_protection="disabled",
)Data plane operations
Section titled “Data plane operations”Data plane operations like querying, upserting, and fetching vectors depend on your network access mode.
Public access enabled (default)
Use the host URL from the Pinecone console or the Describe an index API response. For example:
https://my-index-abc123.svc.us-east-1.byoc.pinecone.ioConnect from anywhere using the standard Pinecone SDK or API.
Public access disabled
With public access disabled, you can only connect from within your VPC via private connectivity. You cannot use the Pinecone console for data plane operations (query, upsert, fetch), though control plane operations (create, delete, list indexes) still work.
After deployment, the Pulumi stack outputs include the service name needed to create a private endpoint for your cloud provider. Use this service name to set up private connectivity:
Create a VPC endpoint
Follow the instructions in the AWS documentation to create a VPC endpoint for connecting to your indexes via AWS PrivateLink.
For Resource configurations, use the VPC endpoint service name from the Pulumi stack outputs.
Select network settings
For Network settings, select the VPC for your BYOC deployment.
Enable DNS name
In Additional settings, select Enable DNS name to allow you to access your indexes using a DNS name.
Create a private endpoint
Follow the instructions in the GCP documentation to create a private endpoint for connecting to your indexes via GCP Private Service Connect.
- Set the Target service to the service attachment from the Pulumi stack outputs.
- Copy the IP address of the private endpoint. You'll need it later.
Create a private DNS zone
Follow the instructions in the GCP documentation to create a private DNS zone.
- Set the DNS name to the following:
<YOUR-BYOC-ENVIRONMENT>.byoc.pinecone.io - Select the same VPC network as the private endpoint.
- Set the DNS name to the following:
Add a resource record set
Follow the instructions in the GCP documentation to add a resource record set.
- Set the DNS name to *.
- Set the Resource record type to A.
- Set the Ipv4 Address to the IP address of the private endpoint.
Create a private endpoint
Follow the instructions in the Azure documentation to create a private endpoint for connecting to your indexes via Azure Private Link.
- Set the Resource type to
Microsoft.Network/privateLinkServices. - Select the Private Link Service name from the Pulumi stack outputs.
- Copy the IP address of the private endpoint. You'll need it later.
- Set the Resource type to
Create a private DNS zone
Follow the instructions in the Azure documentation to create a private DNS zone.
- Set the Name to the following:
<YOUR-BYOC-ENVIRONMENT>.byoc.pinecone.io - Link the zone to the VNet containing the private endpoint.
- Set the Name to the following:
Add a wildcard A record
Follow the instructions in the Azure documentation to add a record set.
- Set the Name to *.
- Set the Type to A.
- Set the IP address to the IP address of the private endpoint.
Once configured, use the private_host URL from the Pinecone console or the Describe an index API response. For example:
https://my-index-abc123.svc.private.us-east-1.byoc.pinecone.ioManage BYOC
Section titled “Manage BYOC”Operations and upgrades
Section titled “Operations and upgrades”Pinecone uses a pull-based model for cluster operations:
- When upgrades, scaling, or maintenance are needed, Pinecone queues operations in the control plane.
- An agent running in your cluster (deployed automatically during setup) continuously pulls pending operations.
- Operations execute locally within your cluster.
- Status is reported back to Pinecone for monitoring.
This model ensures Pinecone never needs direct access to your infrastructure. All operations are stored as Kubernetes CRDs, providing a complete audit trail.
Monitoring
Section titled “Monitoring”You can monitor your BYOC deployment through multiple channels:
Pinecone console
View index metrics (read/write units, latency, storage) in the Pinecone console. Control plane operations and metrics work regardless of your network access mode.
Prometheus
To use Prometheus, configure your monitoring tool within your VPC to scrape metrics from the cluster. Your Prometheus instance must have network access to the BYOC VPC. The deployment output includes the metrics endpoint URL and port for configuration.
Audit logs
All cluster operations are persisted as Kubernetes CRDs for compliance and auditing:
kubectl get cluster-operationsCleanup
Section titled “Cleanup”To destroy your BYOC deployment:
# 1. Delete all indexes via Pinecone API or console
# 2. Then destroy the infrastructure
pulumi destroy
If deletion-protection is enabled (the default), you must either disable it in Pulumi.<stack>.yaml and run pulumi up, or manually delete protected resources via the cloud console before running pulumi destroy:
- AWS: S3 buckets
- GCP: GCS buckets
- Azure: storage accounts
Reference
Section titled “Reference”Troubleshooting
Section titled “Troubleshooting”Common issues and how to resolve them:
Preflight check failures
The setup wizard validates cloud quotas before deployment. If checks fail:
| Check | Resolution |
|---|---|
| VPC / network quota | Request a limit increase via your cloud provider's quota console |
| Kubernetes cluster quota | Request an EKS, GKE, or AKS cluster limit increase |
| IP address quota | Release unused IPs or request a limit increase |
| Instance / machine type availability | Verify the required type is available in your region |
| vCPU quota (Azure) | Request a "Total Regional vCPUs" increase via the Azure Portal (minimum 8 required) |
| VM SKU availability (Azure) | Verify Standard_D4s_v5 and L-series SKUs are available in your region |
| Resource providers (Azure) | Register required providers: Microsoft.Compute, Microsoft.ContainerService, Microsoft.Storage, Microsoft.Network, Microsoft.KeyVault, Microsoft.ManagedIdentity, Microsoft.Authorization |
| Required APIs (GCP only) | Enable Compute Engine, GKE, Cloud Storage, and Cloud DNS |
Deployment failures
If pulumi up fails partway through:
pulumi refresh  # Sync state with actual resources
pulumi up       # Retry deployment
Cluster access issues
Ensure your cloud credentials match the account where the cluster is deployed:
aws sts get-caller-identitygcloud auth list
gcloud config get-value projectaz account showIndex stuck in terminating state
If you destroyed the cluster before deleting indexes, indexes may be stuck in a "terminating" state. Contact Pinecone support for assistance.
For additional help, see the GitHub Issues for the deployment repository.
Limitations
Section titled “Limitations”Some features available in the standard Pinecone service aren't yet supported or have constraints in BYOC:
- Each organization can have up to 2 BYOC environments. To request an increase, contact Pinecone support.
- Integrated embedding and inference, which relies on models hosted by Pinecone outside your cloud account.
- Reading and writing data from the index browser in the Pinecone console.
- Pinecone CLI data plane operations (queries, upserts, fetches). Control plane operations (create, list, delete indexes) work as expected.
- Imports from private cloud storage buckets, unless the bucket is in the same cloud account as your BYOC deployment.
- On-demand indexes. BYOC supports dedicated read node indexes only.
To monitor with Prometheus, you must configure Prometheus within your VPC.
Answers to common questions about BYOC:
Does Pinecone have access to my cloud account?
No. BYOC is designed so Pinecone never needs direct access to your infrastructure. Specifically:
- Pinecone does not need SSH, VPN, or inbound access to your cluster.
- You control cloud account boundaries, networking, and Kubernetes access.
- Operational changes run through explicit, software-mediated workflows.
- You don't open inbound firewall ports for Pinecone operations.
Operations are executed via a pull-based model where your cluster retrieves and runs operations locally. All communication is outbound from your cluster.
What data leaves my cluster?
Does not leave your cloud account:
- Vectors, metadata, and index contents
- Query and upsert payloads
- Customer data
Can leave your cloud account:
- Operational metrics and traces (for example, CPU, memory, latency)
- Cluster health and operation status
Customer data is filtered out before transmission and never leaves your cloud account.
What is the difference between BYOC and Pinecone's standard service?
In the standard service, Pinecone manages all cloud resources and includes their cost in the service fee. In BYOC, you provision and pay for cloud resources directly through your own cloud account, providing greater control, data sovereignty, and access to available cloud credits or discounts. For a cost breakdown, see Pricing.
How does authentication work?
You use API keys from the Pinecone console, just like with the standard Pinecone service. Authentication is handled by Pinecone's global control plane, and your data plane caches API keys locally. This means you manage users and API keys through the console as usual.
How is data secured in BYOC?
Data is stored and processed exclusively within your cloud account, with encryption at rest and in transit. You control at-rest encryption for the underlying resources (including KMS keys in your account) the same way you do for other infrastructure. Communication between the data plane and control plane is encrypted using TLS. Private connectivity (AWS PrivateLink, GCP Private Service Connect, or Azure Private Link) can be used for additional network isolation. For how this relates to hosted CMEK, see Encryption and customer-managed keys.
Which cloud providers does BYOC support?
BYOC is available on AWS, GCP, and Azure.
What happens if I destroy the cluster before deleting indexes?
Indexes cannot be properly terminated if the cluster is destroyed first. Always delete indexes via the Pinecone API or console before running pulumi destroy.
What is the __SLI__ project in my organization?
Deploying a BYOC environment creates an internal project named __SLI__ in your organization. This is used by Pinecone to enforce SLAs for your BYOC environment. Do not modify or delete this project.
Pricing
Section titled “Pricing”Your Pinecone bill for a BYOC environment has two parts: a flat platform fee and a rate for each dedicated read node you run. Separately, you pay your cloud provider directly for the underlying infrastructure (Kubernetes nodes, object storage, block storage, networking, etc.).
Pinecone bill = platform fee + (node rate × number of nodes)| Term | Description |
|---|---|
| Platform fee | Flat monthly fee for each BYOC environment. Covers the always-on Pinecone components that serve writes and control operations, plus support. |
| Node rate | Monthly rate for each dedicated read node running in your cluster, metered in node hours. The rate varies by node type (b1 or t1). Unlike the standard service, it's the same in every cloud and region. |
| Number of nodes | Sum of shards × replicas across every index in the environment, counted separately for each node type. |
If an environment runs both b1 and t1 nodes, calculate the node cost for each type and add the results.
Unlike dedicated read nodes in the standard service, BYOC has no separate Pinecone charges for storage or writes. That data lives in your own cloud account, so you pay your cloud provider for it instead of Pinecone.
Example: An environment with one index using two shards and two replicas runs four b1 nodes, so its monthly bill is the platform fee plus four times the b1 node rate, plus what you pay your cloud provider.
The Pinecone BYOC agent running in your cluster measures node usage, periodically reporting which nodes are provisioned. Billing follows the agent heartbeat connection to Pinecone's control plane:
- When Pinecone receives heartbeats, you're billed for the nodes the agent reports, even if the cluster is unhealthy.
- Short heartbeat interruptions (under 60 minutes) are treated as a grace period.
- If heartbeats are missing for more than 60 minutes, billing stops and the deployment is marked disconnected.