Connect your users to Pinecone
Embed a Connect to Pinecone flow in your app or notebook so users can sign in, choose a project, and receive an API key without leaving your integration.
To reduce friction for users using your integration, you can create a custom object, like a button or link, to trigger a Connect to Pinecone popup from your app, website, or Colab notebook. Within this popup, your users can sign up for or log in to Pinecone, select or create an organization and project to connect to, and generate an API key. The API key is then communicated back to the user to copy or directly sent to the hosting page, app, or notebook.
Alternatively, you can embed our pre-built widget, which provides the same functionality, but with the ease of a drop-in component.
To start, create an integration ID for your app.
Create an integration ID
Section titled “Create an integration ID”Create a unique integrationId to enable usage of the Connect to Pinecone popup and widget:
-
On the the Integrations tab in the Pinecone console, click the Create Integration button.
-
Fill out the Create integration form:
-
Integration name: Give your integration a name.
-
URL Slug: This is your
integrationID. Enter a human-readable string that uniquely identifies your integration and that may appear in URLs. Your integration URL slug is public and can't be changed. -
Logo: Upload a logo for your integration.
-
Return mechanism: Select one of the following return methods for the generated API key:
- Web Message: Your application will receive the Pinecone API key via a web message. Select this option if you are using the @pinecone-database/connect library. The API key will only be provided to the allowed origin(s) specified below.
- Copy/Paste: The API key will display in the success message, and users will need to copy and paste their Pinecone API keys into your application.
-
Allowed origin: If you selected Web Message as your Return mechanism, list the URL origin(s) where your integration is hosted. The origin is the part of the URL that specifies the protocol, hostname, and port.
-
-
Click Create.
Custom object
Section titled “Custom object”Once you have created your integrationId, you can create a custom object, like a button or link, that loads a Connect to Pinecone popup that displays as follows:
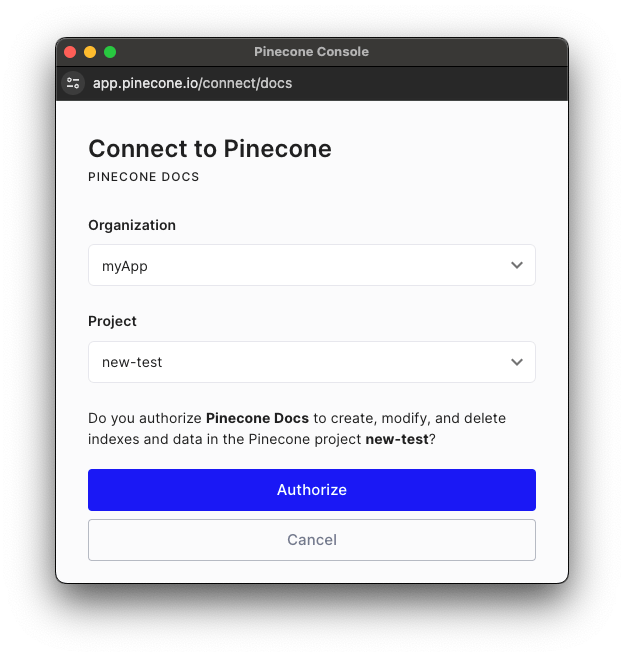
The ConnectPopup function can be called with either the JavaScript library or script. The JavaScript library is the most commonly used method, but the script can be used in instances where you can't build and use a custom library, like within the constraints of a content management system (CMS).
The function includes the following required configuration option:
-
integrationId: The slug assigned to the integration. IfintegrationIdisn't passed, the widget won't render.
The function returns an object containing the following:
open: A function that opens the popup. Suitable for use as an on-click handler.
Example usage of the library and script:
import { ConnectPopup } from '@pinecone-database/connect'

/*  Define a function called connectWithAPIKey */
const connectWithAPIKey = () => {
  return new Promise((resolve, reject) => {
    /* Call ConnectPopup function with an object containing options */
    const popup = ConnectPopup({
      onConnect: (key) => {
        resolve(key);
      },
      integrationId: 'myApp'
    }).open();
  });
};

/* Handle button click event */
document.getElementById('connectButton').addEventListener('click', () => {
  connectWithAPIKey()
    .then(apiKey => {
      console.log("API Key:", apiKey);
    })
    .catch(error => {
      console.error("Error:", error);
    });
});<head>
...
<script src="https://connect.pinecone.io/embed.js"></script>
<script>
const pineconePopup = ConnectPopup({
onConnect: (key) => console.log(key),
onCancel: () => console.log("Cancelled"),
integrationId: 'myApp'
});
</script>
...
</head>
<body>
...
<button onclick="pineconePopup.open()">Connect to Pinecone!</button>
...
</body>Once you have created your integration, be sure to attribute usage to your integration.
Pre-built widget
Section titled “Pre-built widget”The pre-built Connect widget displays as follows:

Once you have created your integrationId, you can embed the Connect widget multiple ways:
- JavaScript library (
@pinecone-database/connect) or script: Renders the widget in apps and websites. - Colab (
pinecone-notebooks): Renders the widget in Colab notebooks using Python.
Once you have created your integration, be sure to attribute usage to your integration.
JavaScript
Section titled “JavaScript”To embed the Connect to Pinecone widget in your app or website using the @pinecone-database/connect library, install the necessary dependencies:
# Install dependencies
npm i -S @pinecone-database/connect
You can use the JavaScript library to render the Connect to Pinecone widget and obtain the API key with the connectToPinecone function. It displays the widget and calls the provided callback function with the Pinecone API key, once the user completes the flow.
The function includes the following required configuration options:
-
integrationId: The slug assigned to the integration. IfintegrationIdisn't passed, the widget won't render. -
container: The HTML element where the Connect widget will render.
Example usage:
import {connectToPinecone} from '@pinecone-database/connect'

const setupPinecone = (apiKey) => { /* Set up a Pinecone client using the API key */ }

connectToPinecone(
  setupPinecone,
  {
    integrationId: 'myApp',
    container: document.getElementById('connect-widget')
  }
)
If you can't use the JavaScript library, you can directly call the script. For example:
<head>
  ...
  <script src="https://connect.pinecone.io/embed.js">
  ...
</head>
<body>

<div id="widgetContainer"></div>
...

<script>
  connectToPinecone(
    (apiKey) => {/* Use the apiKey to create an index*/},
    {
      integrationId: 'myApp',
      container: document.getElementById('widgetContainer'),
    }
  );
</script>

...
</body>To embed the Connect widget in your Colab notebook, use the pinecone-notebooks Python library:
# Install dependencies using Colab syntax

pip install -qU pinecone-notebooks pinecone[grpc]# Render the Connect widget for the user to authenticate and generate an API key
from pinecone_notebooks.colab import Authenticate
Authenticate()
# The generated API key is available in the PINECONE_API_KEY environment variable
from pinecone.grpc import PineconeGRPC as Pinecone
from pinecone import ServerlessSpec
import os
api_key = os.environ.get('PINECONE_API_KEY')
# Use the API key to initialize the Pinecone client
pc = Pinecone(api_key=api_key)Manage generated API keys
Section titled “Manage generated API keys”Your users can manage the API keys generated by your integration in the Pinecone console.